Webmentions for your Static Site
Some time ago, my friend and colleague chee told me about Webmentions. I’ll be honest, I didn’t fully understand what they were. It took me about a month to actually look into them, and wow it’s been a while since I’ve been this excited about a technology!
I’m very late to the party, which started back in 2012, but now I’ve arrived I’m ready to fully commit (whatever the web dev equivalent of drinking Kalimotxo Blondes and dancing to Old Town Road is). After reading this post, I’m hoping that you will:
- Be at least half as excited about Webmentions as I am,
- Have some idea how to implement Webmentions on a static website,
- Try sending a Webmention to this page just to see your comments appear below.
This post assumes some knowledge of web technologies and that you’re able to publish your own website.
What are Webmentions?
For the uninitiated, I should probably attempt to explain what Webmentions are. If you know this part then feel free to skip ahead.
Webmention is a web standard for mentions, conversations, and other social interactions (such as likes and reposts). It defines a way for these interactions to happen across different websites without the need for a central server, allowing for decentralized interactions with other people on the web. At its core, a Webmention is a notification from one site to another that says “Hi, somebody linked to your website from this one”.
Webmention Flow
A typical Webmention flow might look like this, for example:
Kara writes an interesting post on her website (which is set up to receive Webmentions).
Simon reads Kara’s post and links to it in a new post on his own site.
Simon’s publishing software sees this link and sends a Webmention to Kara’s website. This Webmention lets Kara know that her interesting post has been linked to, including the URL of Simon’s post.
Kara’s website checks that Simon’s post actually contains a link to her post, and then it includes this information on her site.
The end result of this flow is that Simon’s post links to Kara’s, and Kara’s now links back to Simon’s. The information can be displayed in any way and, in this scenario, Kara might want to display Simon’s post as a comment on her post. They have achieved this and avoided many of the issues with centralized commenting systems:
The commentary on Kara’s post is decentralized – it is stored on Simon and Kara’s websites, rather than relying on a third-party server. Both people own all the content they’ve written.
Neither person has had to hand their personal information over to a third party.
Kara does not need to maintain a “comments” form or any kind of sign in for people who want to comment on her posts.
So that’s webmentions! If you need more of a deep dive than this, then I recommend starting with this article.
Static Site Difficulties
In my previous example, I talked about servers being able to send and receive webmentions. With a static website (one that is plain HTML or is built from a Static Site Generator), there is no server involved. This means that both sending and receiving webmentions require a few more hoops to jump through:
Receiving webmentions isn’t possible without some kind of server, you need a URL that can receive
sourceandtargetURLs and store the result somewhere and this isn’t possible with plain old HTML.Sending webmentions manually is possible, but it adds a new step for you to complete every time you publish content. It’s possible to fully automate sending during the build step of your static site.
Displaying webmentions requires you to store them somewhere, which means you need a static site generator that supports rendering content from data files (e.g. JSON), or you need to accept that you can only render webmentions with JavaScript on the client.
Receiving Webmentions
As mentioned above, you need some kind of server to receive webmentions. Luckily there are a few services which can do this for you. I opted for Webmention.io which is a free hosted service. To set up the basics of receiving webmentions, you’ll need to:
Set up IndieAuth for your website:
Make sure a social profile of yours (e.g. Twitter, GitHub) links to the home page of your website. You can do this via the edit profile page of these services (Twitter’s is here and GitHub’s is here).
Make sure that your home page includes a link to the same social profile page with a
rel="me"attribute. I have these links in my site header, but they could go anywhere:<a href="https://twitter.com/rowanmanning" rel="me"> @rowanmanning on Twitter </a>Because both the user profile page on the third party website and your website now include
rel="me"links pointing to each other, IndieAuth can verify that you are who you say you are. The standard behind this is called RelMeAuth.
Sign into Webmention.io using your newly configured IndieAuth website. You’ll need to authenticate via one of the third parties you linked to.
Add a
<link>element to the<head>of every page on your website where you want to receive webmentions – I just added it to every page. This link acts as an instruction to other Webmention-enabled sites that you’re using Webmention.io and that they should send webmentions here:<link rel="webmention" href="https://webmention.io/YOURDOMAIN.COM/webmention" />
Now you’re ready to receive webmentions! If somebody who publishes webmentions links to your website, it will appear on your Webmention.io dashboard for you to see.
An additional step for me was that I wanted to capture interactions on social websites like Twitter. The large social sites don’t implement Webmention themselves, however, another third party service can be used to watch for social interactions on other sites and publish webmentions on their behalf.
Setting up Bridgy was relatively quick, and it can connect to many social sites and forward on any interactions with your content as webmentions. I added Twitter, which means that any time someone tweets a link to my content, or likes/retweets links to my content, I’m notified and can display it on my website.

Storing Webmentions
So now you’re receiving webmentions, it’s time to store them alongside your website code so that we can move onto the next step, displaying them. For this, you’ll need for your website to include a build step, which is already needed for many Static Site generators.
My website is built with Hugo and is hosted on GitHub Pages, so I already have a build step that uses GitHub Actions to automatically generate the static HTML and deploy it via the build branch.
Hugo allows for your website to access JSON files in the data folder so, for me, it makes sense for my build step to fetch webmentions from Webmention.io via their API and store them in this folder for use later.
I won’t document the entire script that I wrote, but I went with the approach of fetching new webmentions every 30 minutes using GitHub Actions scheduling. You can find documentation on scheduled actions here.
My script started out pretty much like this (you can get your own Webmention.io API key from your settings page):
const got = require('got');

const response = await got('https://webmention.io/api/mentions.jf2', {
    responseType: 'json',
    searchParams: {
        domain: 'rowanmanning.com',
        'per-page': 1000,
        token: process.env.WEBMENTION_API_KEY
    }
});

console.log('Webmentions!', response.body.children);
It got complicated fairly quickly. The things I added were:
- Storing the last time we fetched webmentions to reduce unnecessary work,
- Converting the webmention URL to a safe filename, e.g.
/weeknotes/36/to/data/webmentions/weeknotes--36.json, - Saving each of the webmentions for a specific URL into the relevant JSON file,
- Committing these new files and pushing them to the repo so that we don’t need to fetch webmentions on every build.
You can look at the full script here, and you can also see an example of these saved JSON files on GitHub: here’s the JSON file for my Yeehaw blog post.
So now that we’re storing our webmentions alongside our website content, the next step is displaying them on each of the pages.
Displaying Webmentions
With webmentions saved as JSON, the next thing we need is to display them alongside the content they link to. This step will differ depending on which static site generator you’re using. For my site, built with Hugo, it meant adding something like this to my page templates:
{{/* Replace "/" in the relative permalink of the post with "--" */}}
{{/* this matches the file names of our JSON files */}}
{{
  $slug := .RelPermalink
    | replaceRE "^/|/$" ""
    | replaceRE "/" "--"
}}

{{/* Access Site.Data.webmentions[slug] */}}
{{/* which is the JSON file matching our page */}}
{{/* default to an empty array if no mentions exist */}}
{{
  $webmentions := index $.Site.Data.webmentions $slug
    | default slice
}}

{{/* ...loop over webmentions and display them */}}
<ul>
  {{ range $webmentions }}
    <li>
      Mentioned on
      <a href="{{ .source }}">{{ .source }}</a>:
      {{ .content | safeHTML }}
    </li>
  {{ end }}
</ul>
Webmention as a standard doesn’t specify how you should display webmentions on your website. It also doesn’t advise on how to safely include other peoples’ content on your website. The above code by itself is an attack vector because it will inject any HTML sent as part of a webmention. This could include malicious <script> elements, adverts, or styles that might break your page or trick your visitors onto malware sites.
With this in mind, the next step is to add in a script that processes the raw webmentions and makes sure that their content is safe to display.
My script is more complex than you might need, but it does the following to make things safer:
It filters webmentions to make sure that they have author details. A lack of author details makes them pretty useless and I decided to exclude them as they most often indicate spam.
If a webmention includes HTML, it runs it through DOMPurify with some custom settings. This strips out any elements that could be easily used maliciously – iframes, scripts, styles, etc.
It truncates content intelligently, so that super long HTML doesn’t break my pages. I look for the specific link that led to the webmention being sent and truncate text on either side of it.
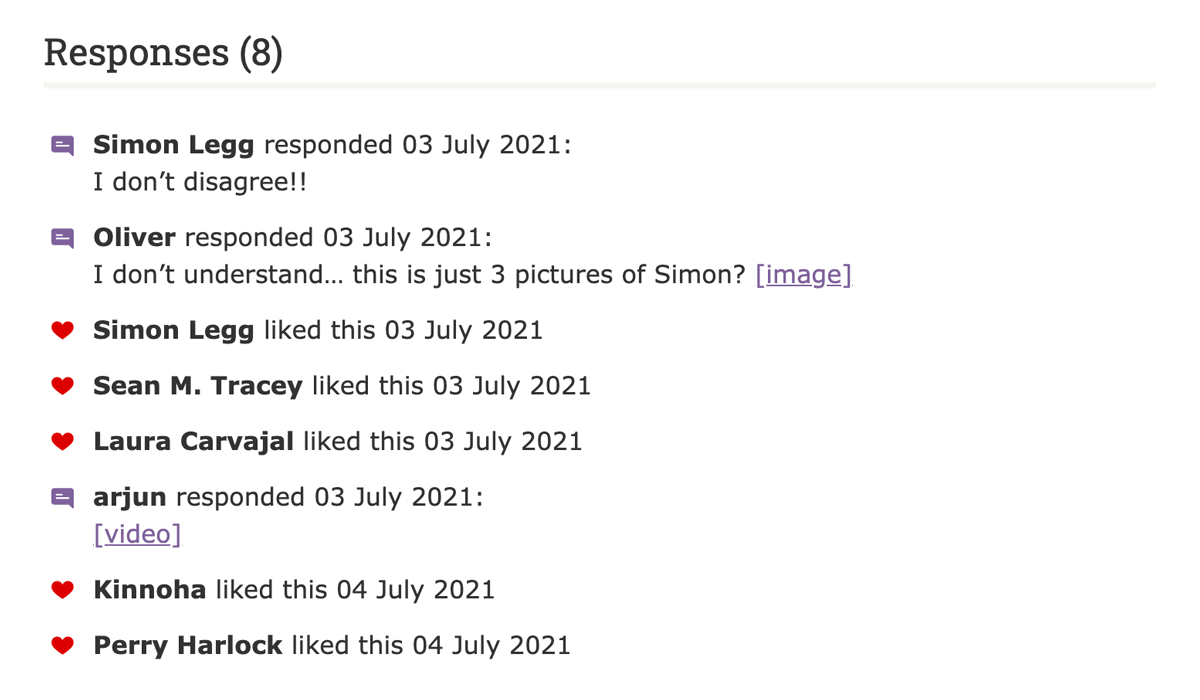
It turns images and videos into links – I just don’t feel like I can trust incoming images to be safe to display on my website and it feels like there’s potential for abuse. I might revise this later and introduce trusted sources for image and video content.
It normalises webmention types and adds metadata (like whether the mention is from Twitter) so that I can choose to display these differently on the website.
You can view the way that webmentions display on my site by looking at the responses section of many of my weeknotes and posts. You could stop here, but sending webmentions to your friends is also fun.
Sending Webmentions
Now that your site is receiving webmentions, it’s time to start alerting other people when you link to their content! I found the process of sending a Webmention to be tougher to implement, and it feels a little more disjointed than my approach to receiving.
This section is split into multiple headings because there’s some preparatory work we need to do to the site HTML before we can send webmentions.
Webmention Markup
The page which is sending a Webmention must mark up content in a way that indicates which part of the page is content, which is author information, which is the title, etc. You can also specify what type of Webmention should be sent – because the spec and the flow are relatively light, there’s scope for a Webmention to handle almost any web-based social interaction, which is really cool.
The way that you specify which part of the page is content and what kind of Webmention to send is by using Microformats in your HTML, specifically h-entry and h-card. Microformats help machines to understand your content, they’re less scary than they sound.
So for example if you have a blog post which looks like this:
<article>
    <header>
        <h1>My First Post</h1>
    </header>
    <div>
        <p>Post content goes here…</p>
    </div>
    <footer>
        Published <time datetime="1988-01-26">26th Jan</time>
        by <a href="https://rowanmanning.com/">Rowan Manning</a>
    </footer>
</article>
Our HTML with added Microformat classes would look like this:
<article class="h-entry">
    <header>
        <h1 class="p-name">My First Post</h1>
    </header>
    <div class="e-content">
        <p>Post content goes here…</p>
    </div>
    <footer>
        Published <time class="dt-published" datetime="1988-01-26">26th Jan</time>
        by <a class="p-author h-card" href="https://rowanmanning.com/">Rowan Manning</a>
    </footer>
</article>
Microformats class names help a machine (in this case a Webmention receiver) to parse out the relevant details. These classes start with h-, p-, e-, dt- depending on the property being described, and you can find examples of all the properties for h-entry here.
Now your web page is ready to be parsed by a Webmention receiver, and you’re able to start sending them.
Actually Sending Webmentions
Now that you’ve got the markup in place you can already manually send webmentions! You can use one of many services to do this (I used Telegraph as a starting point).
However, sending webmentions manually gets old pretty fast, and automating the sending was top of my To-Do list.
Ideally, you should only be automatically sending webmentions for new content on your website, so my dilemma was “how do I run something every time new content is published?” as there’s not a simple way to hook into a new post being published on a static site. I could have spent a long time building a script for this to diff the built website in GitHub Actions, but I wanted something quicker to set up.
I found Remy Sharp’s webmention.app was a great compromise. My website already has an RSS feed and webmention.app contains a tutorial on how to send webmentions as soon as new content appears in an RSS feed – this meant I didn’t need to write something to spot new content myself.
So you’ll need:
For your site to be publishing an RSS or Atom feed (most static site generators will make this easy for you).
An IFTTT account to listen for new items in your feed.
A webmention.app token and to have followed this tutorial.
So now whenever I publish new content on my website, I get a notification from IFTTT to say that it’s sent webmentions on my behalf. The process is fully automated and I can focus on writing.
Was it Worth it?
Yes, absolutely! If for no other reason than I had a lot of fun reading about Webmention and digging into the problem of implementing them on a static website. It’s really nice knowing that social interactions with my content will eventually appear on my website and that I control the way everything looks and feels.
Of course, things could be better and I’ll probably work to improve this setup over time:
Maybe I’ll eventually move away from Webmention.io and try to self-host my Webmention receiver.
I’m tempted to write a script to automate webmention publishing, rather than relying on two different third parties.
I want to make a lot of tweaks to the way that webmentions are displayed on my site, and work out a way to add trusted publishers so that I can display their images and videos.
So in conclusion, you should absolutely join the Webmention hype train (I’m looking at you, all the people I occasionally link to in my weeknotes). I think you’ll have fun, and I’m always gonna be willing to talk about this if you want an excuse to chat technology 🙂