Writing a Friendly README
Your project’s README is pretty important; it’s often the first thing that a person new to your project will see, and is frequently the only source of documentation. Your README does the same job for your open source project as a website does for a company, and while websites get a lot of user-experience attention, our README files are rarely even considered from a user perspective.
This post will guide us through writing a friendly README – one that will be helpful and meet developers’ (our users) needs, whether they’re new to the project or know it well, whether they’re a veteran developer or a newcomer.
We’ll be tackling this in sections, using a pretend library called “Paddington” as an example. Let’s start from the top.
Project Heading
While the existence of “the fold” is debatable, it’s fairly widely agreed that the top part of a website should be used to display the most important information. We can apply the same principle to our README.
So what are the most important things? The project name is pretty important, as is what it actually does. So let’s ease ourselves in by adding those:

The above mostly caters for new users, but this top part of the README should help our existing users too; they have a few easy-to-answer questions. When I visit a project that I’m familiar with, I want to know:
- What’s the latest version?
- Is the build passing?
As a new user, I have a few easy-to-answer questions as well:
- What language is it written in?
- What versions of that language does it support?
- Is it tested?
- What’s the license?
We can answer all of these questions with badges! 🎉
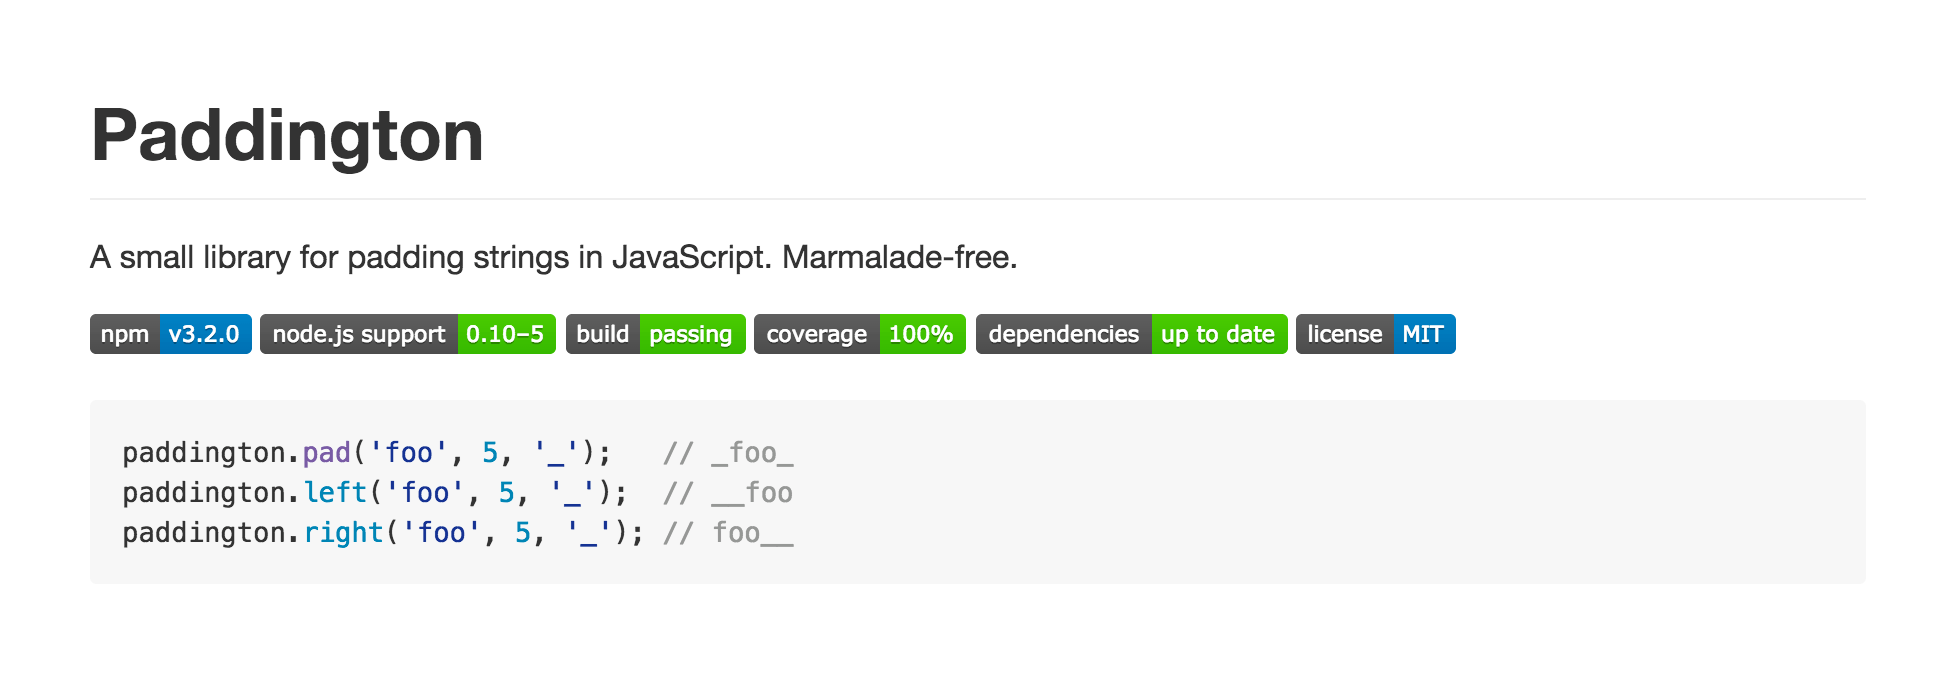
I opt for a row of badges just beneath the project description. A single row doesn’t occupy a lot of space and can convey an awful lot of information:
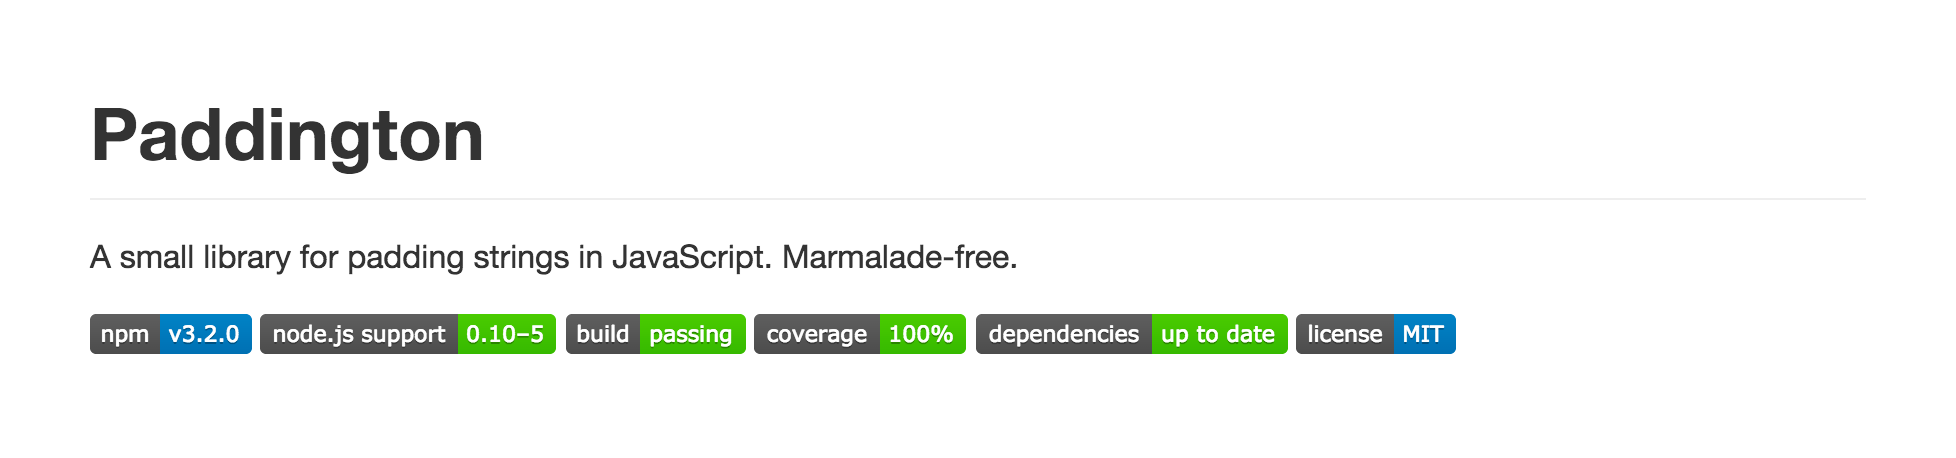
Aren’t they beautiful? I use a service called shields.io which provides consistent badge images as well as a way to add custom badges for license information etc.
Lastly as part of the heading section, if the project or library is simple enough to allow it, we can add a quick usage example. This really helps new users understand what your project does and can be just as helpful as the description.
We’ve covered a lot in our top section in a relatively small amount of space. Well done, us! Now we need to move on to some of the more meaty questions that users have. Our README is going to get longer and potentially difficult to navigate, a sensible thing to do now would be to add a table of contents.
Table of Contents
A table of contents is useful even in a relatively short README. It eases the pain of having to search for information, and gives the user some helpful jump-links to different parts of your documentation.
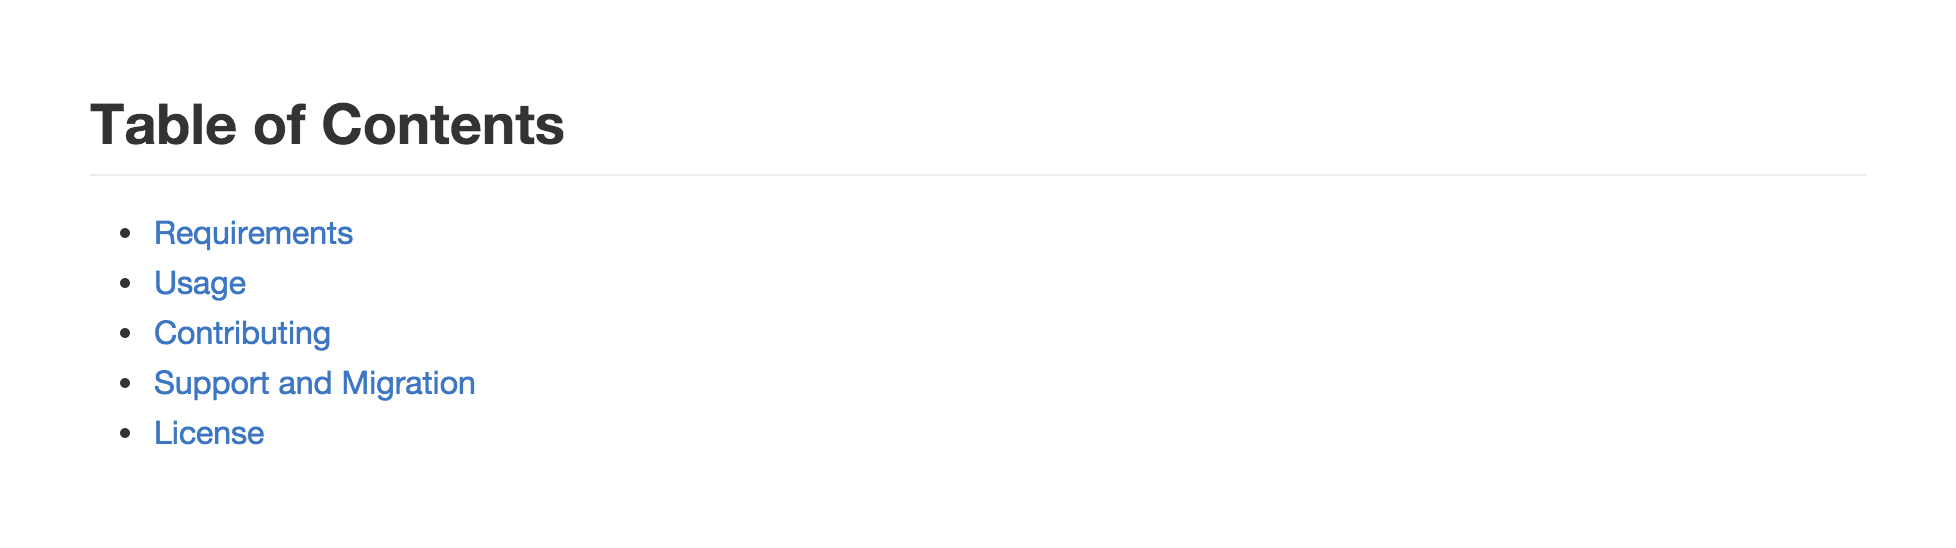
If the user just wants to check the usage guide then why should they have to scroll through the installation instructions, which are potentially only useful the first time somebody uses your project?
Requirements
Now we’ve reached a part of the documentation which is more useful to new users than anyone else, let’s be really friendly and make sure they get what they need. This is the place to add all of the requirements your project has: language, language versions, package managers, operating systems. Anything that isn’t covered as part of the project’s actual installation.
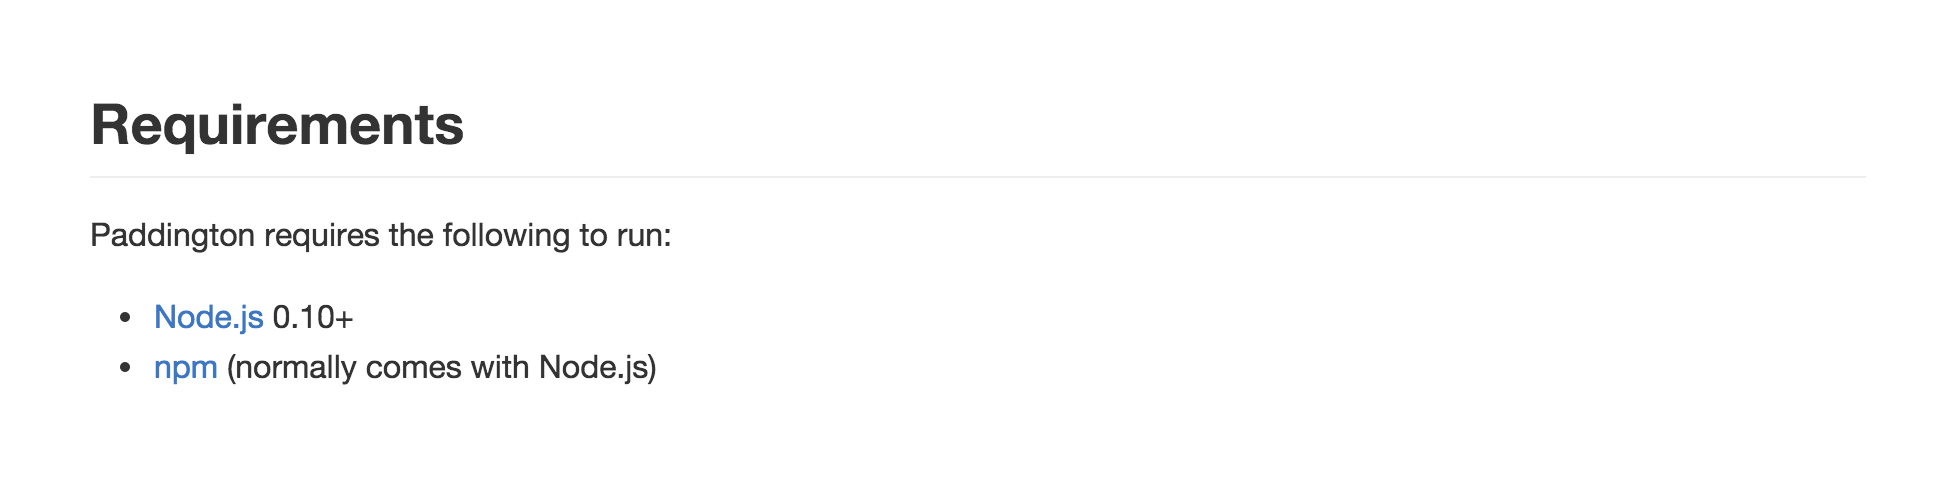
This can be written in prose or as a list, as long as it’s abundantly clear. This helps you too – it means fewer issues being opened asking why somebody can’t get your project running.
You should also assume zero prior knowledge when documenting requirements. Make sure you add links to the language and package managers required, you may be aiding a user who’s completely new to these.
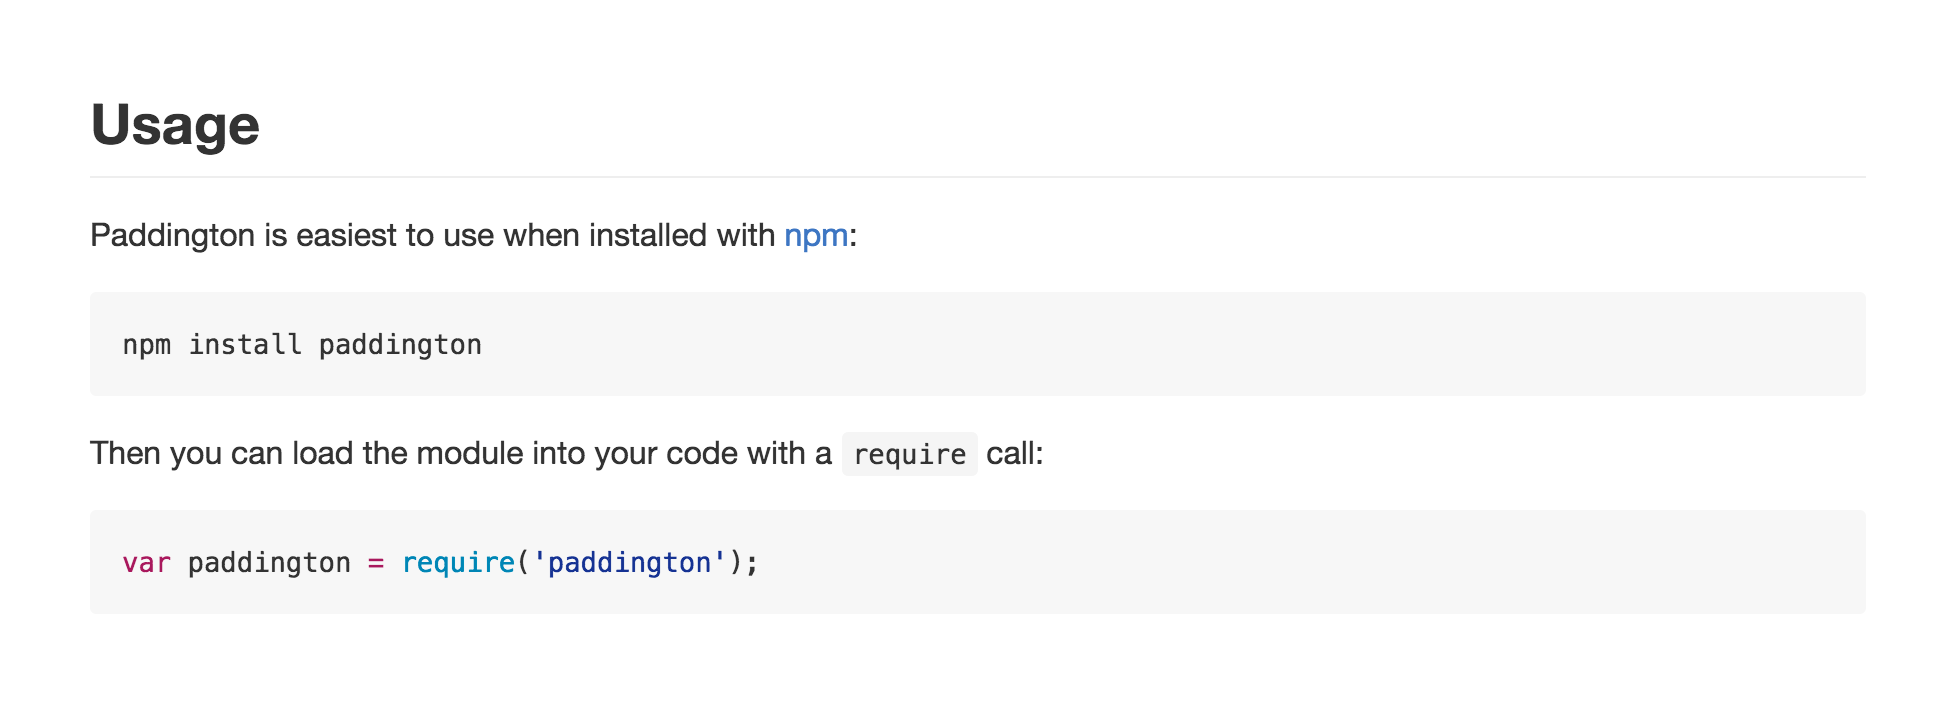
Usage
Your usage documentation is probably the most important part of your README, without it very few people are going to trawl through your code to get it working.
Depending on the kind of project you’re writing a README for, this section could take many forms. You might need documentation for a programmatic API, a web interface, a web API, or a command-line tool; sometimes several of these. The guidelines below reference a JavaScript API, but you can apply them to other interfaces as well.
Firstly we need to mention how to get hold of the code, whether it’s by cloning the repo or installing through a package manager. Don’t forget to link out to anything useful, to prevent anyone from getting stuck.
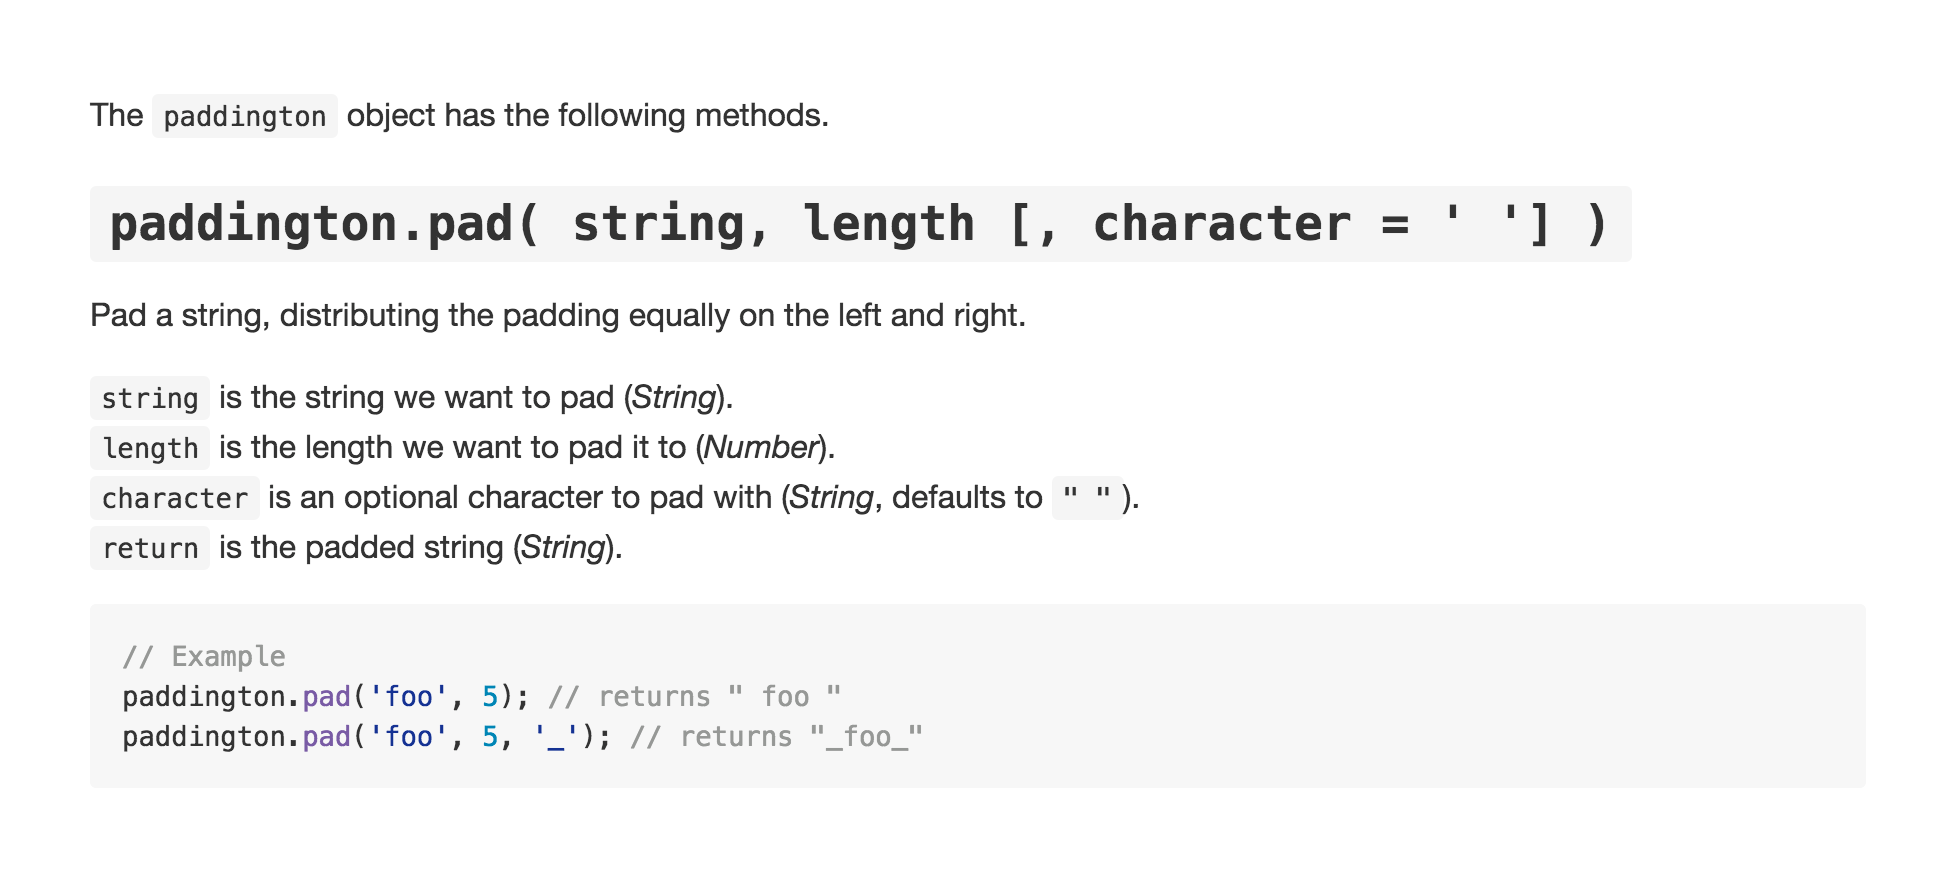
When documenting an API, keep it clear and simple. This means documenting the majority use-case first, your happy path. This keeps everything nicely focused for first-time users. In our case, we outline the method arguments and return values, ideally with examples. The less ambiguous this is, the fewer questions you’ll get.
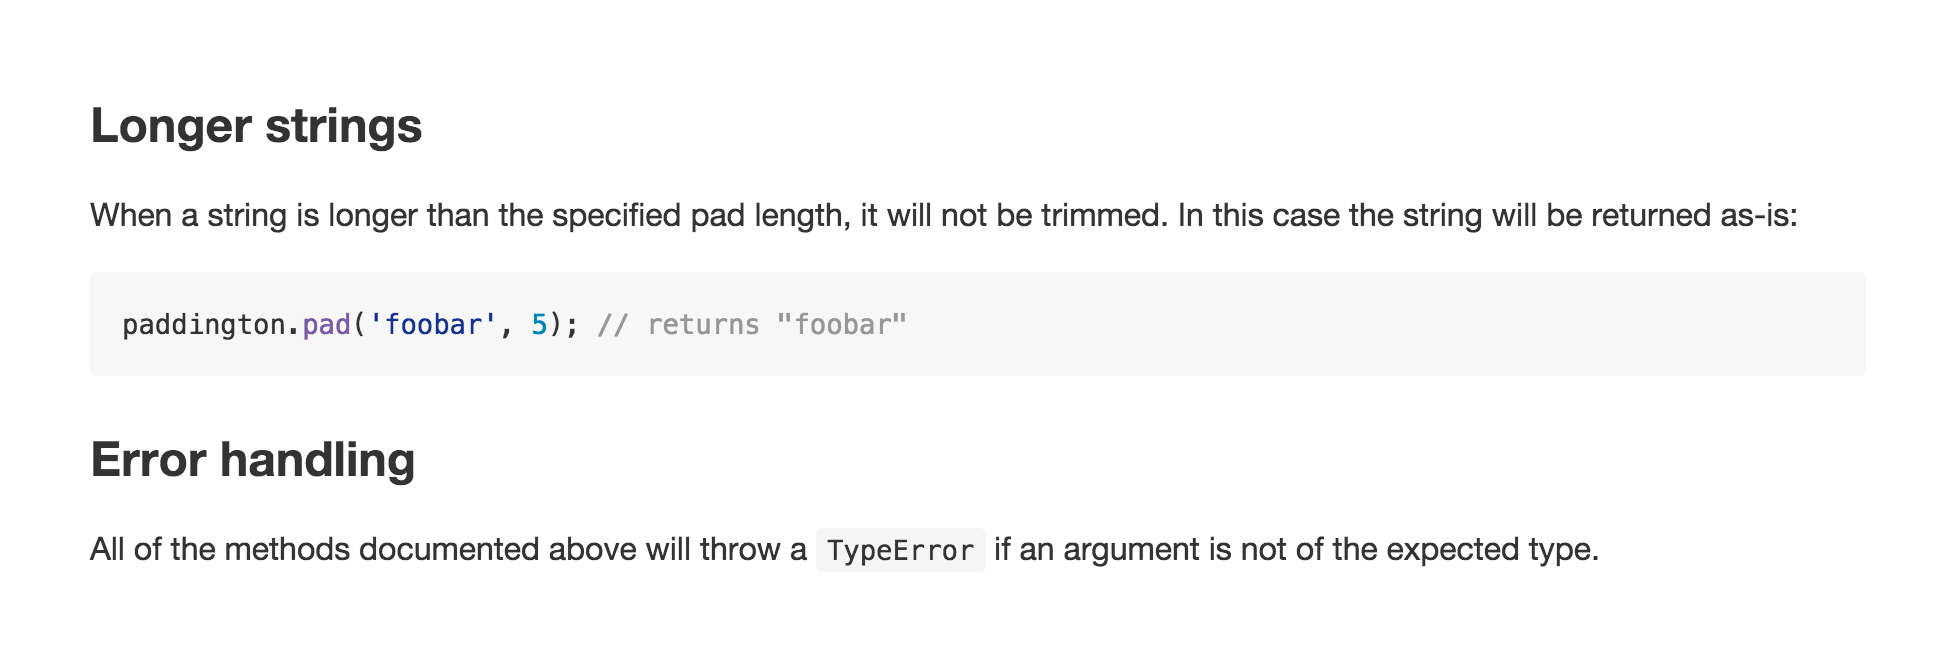
Once we’ve covered our happy path, it’s also useful to document any errors that a user might come across as well as edge-cases. This can form a sub-section towards the end of your usage documentation, and is geared towards people who have already installed and used your project. Try to include a few keywords that stuck or confused users might search for.
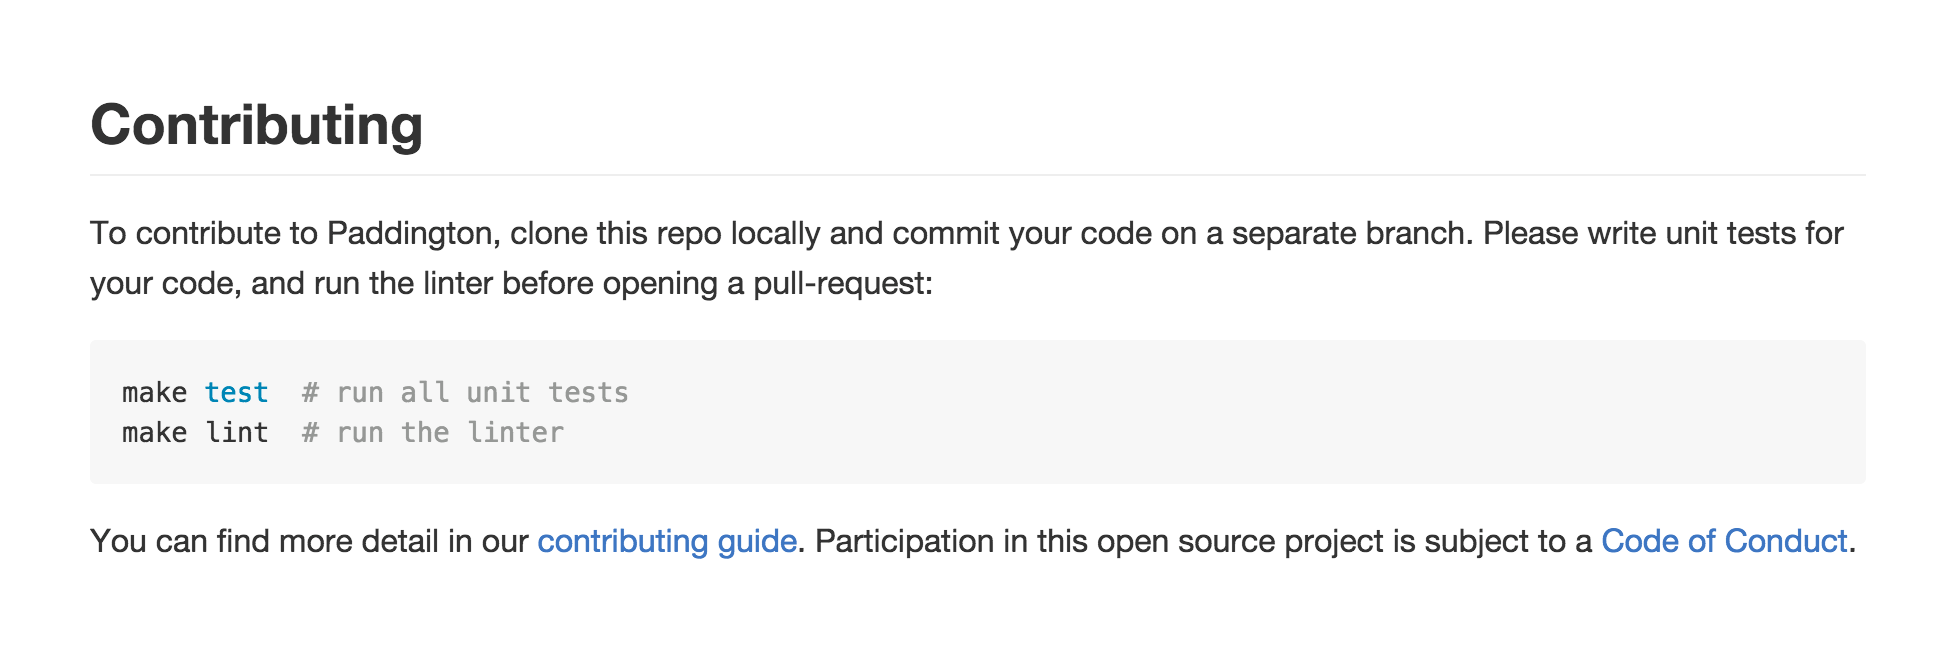
Contributing
This part of your README is important, and can make a difference as to whether a user will become a contributor. Even if you have a CONTRIBUTING file, assuming no prior knowledge of GitHub and open source, a user might not find it. This section should cover the basics and then link out to your CONTRIBUTING file if you have one.
You can help yourself here too, add short instructions on how to run the tests and the criteria for accepting pull requests. This means that your review and acceptance process will be as frictionless as possible.
This is also where you should add a link to your code of conduct, if you have one. You can make new contributors feel more comfortable, and assure them that any issues they have will be resolved. A good code of conduct to use is the Contributor Covenant.
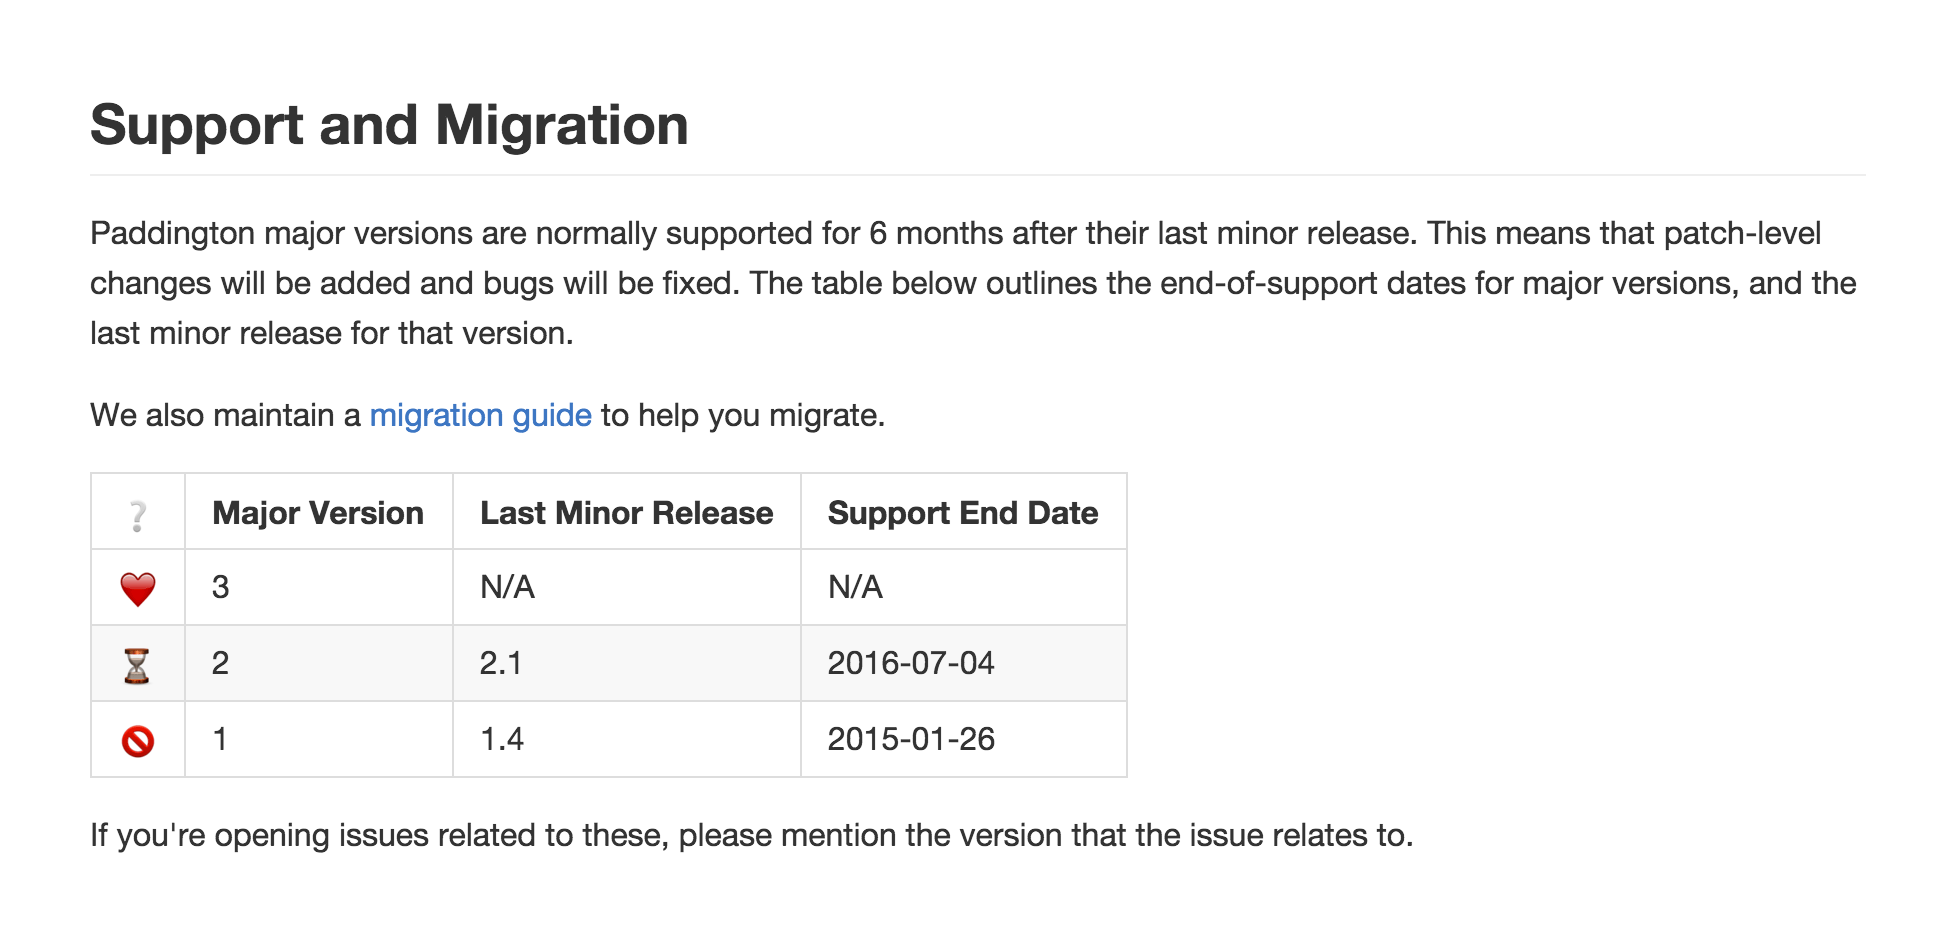
Support and Migration
A section on the support status of your project is very helpful, especially once you’ve released a few different major versions. This section is mostly useful to existing users who may need some hand-holding through a migration between major versions of your project.
A full migration guide might be a bit long to add to your README, I use a MIGRATION file in the root of my project repositories and link to it from this section (see pa11y for an example).
If you have a support plan for older versions, outline it here. Also you can use a simple table to document the major releases and their end-of-support dates.
License
Lastly you should add a copyright notice and a link to the license that your project is released under. Without this information a lot of users, especially working in larger organisations, won’t be able to use your project. Even if you distribute your project with a LICENSE file, it’s helpful to include a link to it here.

Other Sections
What we’ve covered here is by no means all that your README could document. Other sections I’ve used in my projects include:
- Why?
- If your project does something already catered for by another project or is particularly complex, it’s useful to provide some justification.
- Common Questions
- A place for frequently asked questions, to reduce duplicate issues being opened.
- Examples
- Links out to example code or pointers on getting example applications running.
- Thanks
- A section listing and thanking people who contributed to the project in a non-technical capacity.
- Changelog
- A description of and a link to your project’s change log.
The Full README
Now we have a friendly README! You can view the whole thing here.
I’m hoping more people think about the user’s needs when writing documentation, and please let me know if you think I’ve missed anything. I’m interested to hear your tips and opinions on what constitutes a helpful README.